Showing posts with label craft. Show all posts

Thursday, May 27, 2010

Repurposing Store-Brand Box

IMG_4368   

When Vivian was born, I got a darling gift-set for her from a woman in our ward.  It came in an equally cute box.  The only problem was that it had the store name on it.

IMG_4365


Not a problem.  I Just added this…


IMG_4366

Now it is ready to hold her darling memorabilia!

Friday, February 19, 2010

Busy Book—Preschool Skills

I finally finished my “preschool skills” busy book. It kept getting pushed aside for other projects but after seeing it on my “projects pending” list for WAY too long, I finally gave it top priority and finished it in a couple of days. Here it is in all its homemade glory!


Cover

I did the cover in this cute understated material that contrasts with the cover of the other busy book that is still colorful and fun.  I love the snap closure because it makes it less likely to “drop” its contents.

IMG_2418


Alphabet pages

I wanted to use these cute buttons I found for maybe $1 on a Joann’s Clarence rack.  So I had the brilliant(?) idea of using them as the labels for my shape pages.  I traced cute pictures onto white muslin and then afterwards realized that iron-on transfers would have been soo much easier…oh well, you live you learn.

IMG_2419  IMG_2420

IMG_2421   IMG_2423


Shape Page

This was a fun page to create though (of course) now I have even more ideas that I could have used.  This is one of Christian’s favorite pages, I think it’s great that he knows what a parallelogram is!

IMG_2424


Number pages

This is very similar to the alphabet pages except that this one is numbers.  I found some very cute brads from Oriental Trading Company that I used for the “tallies”. It would have been nice to have this ready a couple of months ago because Christian is quite good at recognizing numbers already.  It will be useful when Vivian is ready for it.

IMG_2425IMG_2426


Addition page

This idea was taken from one of the many other busy books I looked at online when I was trying to think of ideas for my busy books.  Yes, there is a stain on it from fabric markers leaking when a certain three-year old was drawing on a paper above this.  This is my least favorite page but it’s pretty fun to watch Christian figure out the sums.  Plus it does familiarize him with math notation at a young age so it won’t seem quite so foreign when he first sees it in school.

 craft 001


What’s the Weather?

This came from my memory of a chart that my mom had on the wall for years in our playroom.  It was always fun for me when I was small to look outside and figure out what the weather was for the day and mark it with the hands.  I think that the idea originated from the Joy School manual. It’s my done in my own scribble with fabric markers so I’m sure it could be much cuter.  


craft 002


Season and Calendar pages

This is the page that was the most intensive to put together.  I had caught on to the iron-on transfers by the time I reached this page so that wasn’t the problem.  It was the bazillion squares that needed to be sewn around.  So basically I put it away and hadn’t pulled it out for a while.  Guess what though? It really wasn’t that bad.  I sometimes get so intimidated by things that really are not so terrible once you get into the swing of things.  I did myself a favor with this page though and bought the sticky backed Velcro rather than sewing it on…it just worth my sanity to do that many squares! This us by far Christian’s favorite page. Of course, it is the most advanced page and much more on his level so that accounts for it but it’s pretty fun.  All the pieces on the Seasons page are pretty much movable except for the Winter, Spring, Summer, and Autumn labels.  I thought of doing it by the year but I felt that learning the seasons and the months in them was probably more easily grasped for preschool age children.  It’s funny what interests kids because Christian has a blast just putting the numbers in order starting with the one on a different day.

IMG_2429


Tick-Tack-Toe Game page

Here is Jared’s favorite page.  Funny huh?  He keeps trying to talk Christian into playing Tick-Tack-Toe (rather than Life which is the game Christian always wants to play) with him.  I think it’s hilarious.  As you can see, I made it with my boy in mind who’s favorite everything at the moment is green… I did a survey the other day for Fisher-Price and I was supposed to ask my child what picture they liked best.  Of course he picked the picture with the most green.

IMG_2430

I’m so glad it’s finished.  It would have been nice to have finished it last year for a 3-year-old but it still is entertaining for a 4-year-old.         

Friday, February 12, 2010

Noah’s Ark Play Mat


One day in December when I was searching around the internet insanely finding more projects to try.  I found this darling pattern for a Noah’s Ark Play Mat at  www.freepatterns.com to make out of a blanket with some felt pieces and then some felt finger puppets to go along with it.  I of course was a little disappointed that there actually was no Noah included (or his wife either) so I made my own pattern up for both of them and then when I found some awesome striped chenille pipe cleaners I decided to make my own pattern for the tiger as well.  I also took this pattern to the next level by sewing everything rather than gluing it as it says to in the instructions.  It would have taken a lot less time if I had glued. I made two of them, one for my niece who just became a big sister and one for my son who just became a big brother. It is much more durable than it would be if glued and hopefully will provide hours and hours of fun play for both of them and maybe their siblings too.

   IMG_2249

Here’s the ark.  If you look at the pattern, I changed pretty much everything about the color scheme but I like mine better.

IMG_2251 

Here are the finger puppets.  Very colorful I must say.

IMG_2247

Here’s everything together.  I really think they turned out cute!

Tuesday, December 15, 2009

Fun sea-shell bracelet

This year in our Christmas drawing, my son picked my cousin, who is a teenager’s name.  I was really excited to give to a girl so that I could give her something fun that is homemade!

IMG_1547

Here’s what I came up with!  I really hope she likes it.  It’s understated though fun especially with all of the colors from these beautiful natural shells.

Monday, November 23, 2009

Advent Stocking

We celebrate German Advent at our house.  If you don’t know what that is, it is basically the four Sunday’s preceding Christmas where you light a candle on an Advent wreath and say a little poem in German.  The first week you light one candle, the next two, and so forth as you say the poem.  Afterwards, we have a child open a gift of some sort (we usually have it be a book or something about or related to Christmas) and then we have some sort of treat.  It’s a fun tradition that my husband’s family started when they lived in Germany (where my husband was born).  Here’s the poem that we recite.


Advent, Advent, ein Lichtlein brennt,

Erst eins, dann zwei, dann drei, dann vier,

dann steht das Christkind vor der Tür.


Roughly translated it means:


Advent, Advent, a candle is lit,

First one, then two, than three, then four

the Christ-child stands at the door. 


The first year we were married, Jared was very adamant that we “Do Advent”.  I searched high and low for an Advent wreath to buy.  I actually ended up thinking I’d have to create one myself and found one at JoAnn’s that came equipped with candle holders and everything.  So, basically, anything Advent always interests me when I’m looking at new ideas of things to do.  I love the Christmas Advent Calendars that “countdown” until Christmas (It might just be my love of Chocolate).  But I found this fun stocking pattern for an Advent stocking and had to try it:


IMG_0001


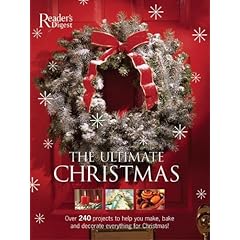
This is from the book:

The Ultimate Christmas Book: Over 240 Holiday Craft, Food and Decorating Ideas by Editors of Reader's Digest

The Ultimate Christmas Book: Over 240 Holiday Craft, Food, and Decorating Ideas

It’s a really great book with all kinds of ideas for Christmas and even New Years including gifts you could make (that don’t look home-made.  I love it!

Friday, October 2, 2009

Fabric Organizing Idea

I’ve been keeping all of my material in a big bin for a while.  I kept the different fabrics separate by just tying a knot in the original bag from the place I got them from.  Well, last week as I was sorting through material looking for scraps to make a quilted pillow for Christian’s bed, Christian came in and announced “Mother, you’re making a giant mess!”  This was partially true though everything was organized by material type.  I guess he decided that he could help make my mess worse so he rolled around in all of my material just like a cat and started throwing rainbows of color and texture in the air and swatting at them.

I was pretty frustrated as I started re-bagging the material.  It was then that I realized there had to be a better way to keep my material easy to see and easy to get at without making a disaster every single time I looked through it. 

So, I decided to bag my material in clean zip-lock bags and placing a paper inside on top that has an explanation of what the bag contains such as fabric type, color as well as amount.  This way, I can see at a glance what is in each bag and how much I have so I’ll know if I have what I need or if it’s time for a shopping trip.  Another nice thing about the plastic bag idea is that it’s pretty compact and I can push all of the air out of the bag and so they fit a little better in my bin.  The largest amount of material I had was 4.5 yds which fit great into a 2.5 gallon bag for other sizes I used anything from lunch size, quart size and gallon sizes.  Safeway was doing a special this week so all of my bags together were under $5 and I have a clean

Here’s a grocery bag filled with all of the various satins that I have..it’s a mess I know and it used to take at least 5 minutes if not more to figure out how much of each material I had…if not more.

 IMG_1232 

Here are all my satins sorted and in bags…I know what I have at a glance!

 IMG_1233

It did take some time to measure everything, fold it, label it, and push out the air, but it is so nice to now open my bin and find what I need very quickly.  I love it!

Red Crafter’s Apron

After the ease of making my purple crafter's apron I decided to try it with a contrasting pocket.  I made this out of a pillowcase that I got for my wedding but never had anything (sheets or otherwise) that matched. Then I found a fun scrap of red with white polka-dots.  This reminds Jared of Mini Mouse but I think it’s pretty cute and kind of has a vintage feel with the dots.

IMG_1238

Friday, September 11, 2009

Purple Crafter’s Apron

My friend Jen was really excited about a website that had lots and lots of links to various patterns of vintage aprons on it—most of which are free.  So she sent me the link it’s http://www.chickensense.com/apron.asp.  I really am hoping to try a lot of the various patterns for aprons because they are something that is functional and can have it’s own theme or match that of the room you use them in and be a decorating element.

I found this cute multi-pocket craft apron pattern from http://www.scribd.com/doc/3017653/apron-Pattern.


I love it! 


IMG_0909

It’s really fun.  They show it in a different color for each piece to use up scraps…but as I don’t have that many pieces of scraps that are big enough and/or go with each other, I decided to just go with this sparkly purple material I’ve been hording for the past year and a half…I had no real use for it except to do a chain quilt…that I never got more than one other set of squares from…but I really like this sparkling stuff. 

The pockets are my favorite element because think of all of the things you could put in them while you’re working on a project and be able to have them close at hand without spreading them out on a table or something that your climbing children can get at.  I made the thinner pocket exactly the right size for a pair of sewing scissors and when they’re in it you can’t see them—another great feature for those of us with young children.

Saturday, June 20, 2009

Busy Book Update

I have spent a remarkable amount of time at home lately and I’ve gotten back into the swing of sewing more lately since there’s really not much else to do in my tiny apartment.  I finished the last of my church busy book pages this morning and thought I’d take pictures before binding them into the book and it’s trickier to keep them flat than it already is.  I got a lot of my great LDS-themed ideas from Mormon Chic’s article on making your gospel themed quiet book.  If they’re my original idea though I’ll let you know.  The most common difference in what I have done is to add a scripture reference so that older children can practice looking up scriptures and finding answers to questions which is a good literacy skill.  If anyone is interested in the templates I used, let me know and I can email them to you since I had to make most of them up and that took a lot of the time of planning out the pages.


Here they are!


Page 1 Noah’s ark

I’ve made little animal matching cards by using the clipart on my computer and then laminated the cards and placed in the zippered pocket.  The darker picture is easier to see the embroidery (what was I thinking?)  but that was taken before I added a title and the lighter it’s easier to see the texture.  I guess I can’t win.

IMG_0001

 IMG_0001

I found these that you have to iron on before you’re finished don’t bleed like the other fabric markers at the craft store.  Plus, you get more colors for your dollar since they are $5.79 here Crayola Fabric Markers and the other brands that I bough ranged from $1.50 each up to $3.99 each which is a pain if you like color. 

I used their markers for the text and their Crayola® Fabric Crayons - 8 Ct.fabric crayon’s for the color of the sky earlier.  I wish I’d found the markers when I’d found the crayons just because they are a lot easier to keep the color even with.


Page 2 Time to Pray

Here is my “learning the clock” page I reinforced the hands with fusible backing to make them thicker.  These words and numbers were done with the more expensive fabric markers but for some reason they were much more difficult to keep from bleeding and not be so light that it looked sloppy. I actually had to try a few different clock faces before the numbers didn’t bleed too much.

IMG_0002  


Page 3 How Much Tithing?

This one’s idea was taken from the Crafty Chic: Quiet Book as well, but I thought it would be better to show how minimal tithing is in comparison to all of the rest of what you have and what better way then using something visual!  So I tore apart an envelope to figure out the pattern for the envelope and then sewed the rest of the coins onto the page and only have the “1” removable.  I wish I had found some gray for the envelope since that would have seemed more like a tithing envelope.

IMG_0004


Page 4 Braid Queen Esther’s Hair

This is my take-off of the original busy books’ I’ve looked at “braid the hair” page.  I crazily embroidered her hair in with a huge needle which gives it somewhat of the appearance of cornrows or tiny little braids.  I also went a little nuts and beaded jewelry for her (her dangling earring is flying in the picture).  She is one of my original ideas and one of my most favorite pages.

 IMG_0005


Page 5 Tree of Life

This idea is just like the “apple tree” pages of other books and is also from the same article.  The thing I did differently was to add the scripture reference and I decided that since the fruit represents the “love of God” that I would make them heart shaped.
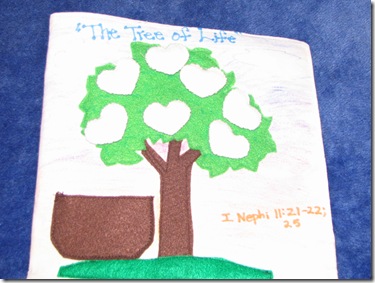
IMG_0008 IMG_0007

I used my favorite markers for the text here since they are so much easier to control.


Page 6 I Love to See the Temple

This is from the gospel quiet book article.  So you can go there for info on how to put it together.  It’s one of the cuter pages and I love how the temple turned out.  I used fabric paint to make the angel gold but I warn you, if you haven’t tried this stuff before practice for a while (it’s trickier on felt than other things because of the texture).
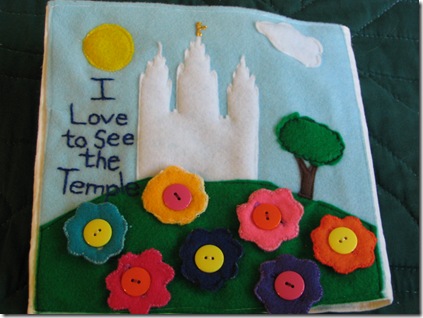
 IMG_0001


Page 7 My Family Can Be Together Forever

This is another one of my own ideas.  I realized that fabric transfers like the ones from Avery are really quite easy to use once you’ve tried them a couple times. For some reason, the T-shirt ones seem to work better on broadcloth than other materials though they are also fine on felt (they can tend to roll or pull off more easily on felt though so be careful).  I just attached cotton to fusible interfacing and then added the fabric transfer of our most resent family photo.  Then I cut our photo like a puzzle and edged it with fray-check to keep the edges of the cotton together.  I backed the puzzle pieces with small pieces of sticky backed Velcro (hooked side).  The dark green for the frame is felt and the Velcro attaches pretty easily to it without being too tight.  I figure that since this part was so easy, it won’t be so hard to change the picture as the family grows through the years and then I can put the various puzzles that have been used in scrapbooks.

IMG_0011


Page 8 Search the Scriptures

This was another one of my own  ideas when I was trying to think of a way to teach buckles. So I thought of the old-fashioned scriptures that used to have some kind of buckle on them.  This is the middle page so I decided to have both pages relate to each other so if you open the book it relates to the next page.
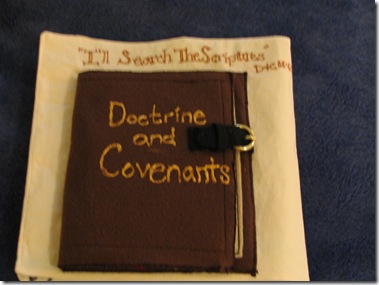
IMG_0013


 IMG_0018

IMG_0015

Iron on transfers were used here so that the words would be clear and readable (hopefully for years to come).


Here is where pieces of the next page are stored so they don’t get lost.


Page 9 Put on the Armor of God

This was another of my ideas.  I thought at first of doing a missionary but then I realized that just getting children and youth to realize that it can be a battle to keep their lives clean in order to be happy is the most important goal.  So I thought of the Armor of God concept that one bishop in my youth used the example of and dressed up a youth in armor that he had made.  So I thought, “why not dress up a paper doll?”  I’ll tell you, finding a paper doll boy that’s not dumb looking is a pain.  Here is the best I found for the armor and the boy.  Nicely enough it’s actually for a sharing time idea so it’s pretty cute and concise unlike some of the other things I found about the “Armor of God”.  It is made to be pretty tiny so I photo-shopped my life away for about three days to make it look nice enough and not so grainy at the proper size so here and then did pretty much the same steps as I did on the “Families Can Be Forever” page to make the pieces with an iron-on transfer.  Man I love those transfers!


IMG_0014


I sewed tiny pieces of the soft side of Velcro and then used the sticky Velcro on the back of the pieces for the armor.  Since the example showed the labels I thought they would be a nice addition to the page just to remind children of the important values to keep strong from the world.

IMG_0017

Here’s my little guy with his armor on.  I hope my own little guy will think that he’s cool enough to emulate throughout the years.


Page 10 Lift Up Your Voice

This is also from the Mormon Chic article.  I cut out my notes from felt and stuffed them with fluff to make them solid.  I still used their cute idea of the yarn so that you can slide the notes from one side to the other.  My little guy thinks it’s great that I know what the “melody” sounds like each time he changes the order of the notes.  Too bad Jared won’t be able to entertain him with it in the way.  I guess he will just have to learn how to sight-sing!


IMG_0012


Page 11 Faith in Every Footstep

This boot was a huge pain to find an example for.  I really didn’t like the examples in other busy books so I finally found a good perspective from a picture of  Kirsten the American Girl off of Amazon.    So I blew it up to giant proportions and then cut it out in decorators vinyl (which I still have quite a bit of).  I did the eyelets with the help of my new toy/tool a cropadile that is for eyelets from size 1/8” to 3/8” and snaps as well (which I actually haven’t tried).  It was amazing how incredibly easy it was to use this.  I got it from Joann's with one of their great half-off coupons so it was only about $15 and well worth it.  I used a piece of leather I’ve had laying around for a while for the laces since it seemed more “authentic” looking.  If anyone would like me to give them a shoe cut-out of vinyl with eyelets I’ll do it for a $1 + shipping.  The sewing in was the most difficult part since my machine is crazy with the guider which makes stretchy material bunch on the top.  So I’m glad I started at the top left corner so that by the time I got to the end where it started bunching it was where most boots bunch a little—right above the heel.

IMG_0009


Page 12 Children All Over the World

This page was my own idea.  I love the song “Children All Over the World” from the Primary songbook.  I did an iron-on transfer of a clip-art picture of the earth and then stuffed it a little.  I got the darling little finger puppets from my local  Ten Thousand Villages.  They were a little pricey but since the profits go directly to the artisans rather than them getting a huge cut, I always feel a little better about spending my money there.  I went a little crazy with attaching these little guys and have a long ribbon sewn to the bottom of them and then a ribbon to tie around their waists when it’s time to put them away so they’re not flying everywhere.


IMG_0010


Page 13 The Word of Wisdom

This one I got the idea from another busy book I’d seen before and then the Primary Partners CD I have had something similar.  So, I used the healthy and unhealthy things from the Primary Partners and then did my own fridge (out of felt) and garbage can (out of some leftover costume material) and sewed Velcro on the front of the page and in the fridge to (hopefully) reduce losing pieces.  I’m so glad I thought to look in my Primary Partners CD for this one since the first busy book I saw with this idea they where all hand-made out of felt and embroidered.  That would have taken FOREVER!  This way it was pretty easy.

IMG_0006


Page 14 Choose the Right

This is pretty straight-forward.  It’s the same basic idea as the one in the Mormon Chic article and I thought it would be nice to have something that takes a little more time to do (such as writing or drawing).  It’s kind of corny but my little boy loves this page and that’s what matters.

IMG_0007


Page 15 Write a Note


This is from some other busy books I’ve seen.  I love the mailbox with the flag (probably because I’ve never actually had one).  So it’s appealing to me.  This was pretty easy once I made up the pattern and set the brad.  I did have to reinforce the flag with fusible interfacing so it would be strong enough.

IMG_0003


Page 16 Lets Be Together Forever

I took this directly from the Primary Partners CD-Rom that I already had and just did it on an iron-on transfer.  They have some really great ideas.  If you’ve never bought Primary Partners products before, I recommend leafing through their books at the store and then buy the CD-Rom since you can manipulate the sizes and some are colored and some are black & white (as long as you have a printer of course).


I’ll post next about my busy book once I’ve got it bound!
Technorati Tags: ,