Showing posts with label sewing. Show all posts

Thursday, May 27, 2010

Infant Play Mat Combining Functionality and Design…

One of the things that I indulge in way too frequently is watching HGTV.  I don’t love all the shows, but I think the real problem is that as the ability to buy a house is approaching, I’m completely enamored in the idea of knowing what I want to do with my someday home.  Good grief, I’ve wished for a home since I was 14 and I asked my mom why she did something a certain way and she said “You do it your way when you have your own home”.  My favorite shows have designers staging or redecorating (I love “Divine Design”!).  Jared is a HGTV addict too but he’s much more interested in Holmes on Homes and the Home Buyers shows. 

One of the common threads that I’ve found in all this TV watching is that a lot of parents let their children’s toys overtake the main rooms of their homes.  In my parent’s home toys were banned from the front room.  This is fine and dandy if you have a family room as well as a living room.  But for those of us who have less space it’s tricky.          

I came up with a wonderful solution… I designed a tummy-time play mat that uses the colors of my front-room and is a piece of art—using a bold contrasting pattern while mixing patterns and not being too garish—a visual delight.  I used a combination of cotton, velvet, valor, and faux suede to indulge the tactile sense. The leaves make crackle noises while the centers of the flowers squeak.

IMG_4342

Now my baby can play on the floor in happiness with lots of stimulation and my room still looks organized and modern.  I’m considering opening up an on-line shop to sell these.  I would customize them to match the colors of the room that they were made for (not necessarily the nursery colors).  What do you think?  Would you pay for something like this?  Or would you rather have a pattern and make your own? I am planning to design some that are more gender-neutral/masculine as well if this idea is well-received.  If you do like it, what would you pay for something like this? 

IMG_4361

Constructive comments would be very welcome.

Tuesday, April 6, 2010

Pretend Sheath or Scabbard Tutorial

So Christian has ruined a belt and two ribbons that he has tied around his waist and used as a sheath while playing prince and so I promised to make him a sheath or scabbard.  I think it turned out rather well.  I think the next time I try this I’d like to try real leather though because the nature of his play is a little rough if you know what I mean.  He loves his sheath and it’s the thing he always has on at home if he’s not asleep. :)

IMG_3038   

It wasn’t too difficult though I wish that my eyelet’s worked better…they didn’t set well into the material so they turned out to be just holes but they look pretty cool if you ask me (the holes I mean).  It gives it a rustic look.  I’ll get more heavy-duty eyelets made for belts next time.

Materials Needed:

Sword (for measuring)

1/4 yd faux-leather/decor vinyl or other sturdy material

thread

heavy-duty needles

scrap of contrast material


Method:

1. Place sword on material and fold over.  Leave at least 2 inches on each side of the sword.

 IMG_2678  IMG_2680

2. Fold bottom portion of scabbard in half and round off with scissors.

IMG_2681

3. Measure contrasting material to match width of scabbard and cut to be 3 inches long.IMG_2682 IMG_2683

4. Fold bottom edge of contrasting material 1/2 inch.  Press.

IMG_2688

5. Pin Contrast over top portion of scabbard.

 IMG_2689

6. Sew in place using a decorative stitch if desired

 IMG_2691 IMG_2692

7. Cut remaining material to be 6 inches wide and 5 inches longer than waist intended for (i.e. waist was 20 inches so cut material 25”x6”).

IMG_2693

8. Cut a piece that is 6x5 for loop.

IMG_2694

9.  Mark belt starting 2” from edge every inch for four inches.

 IMG_2695 

10. Sew in female side of snaps at markings.

  IMG_2698   

11. Fold Belt in half and then overlap  (as a belt does) and mark where male side of snaps go across from female snaps.  Sew snaps at markings (no photo).

12. Should have all three pieces prepared.  Can embellish by adding eyelets, grommets, or holes. 

 IMG_2705 

13. Fold over top edge of scabbard and sew in place (can use a decorative stitch if desired)

IMG_2707 IMG_2708

14.  With right sides together fold scabbard in half and sew along the side 1/2” away from edge. IMG_2709 

15. Fold belt portion in half right sides together sew 1/2” along edge. Turn over.

IMG_2725

16.  Fold in outer edge and hand sew with a heavy duty needle about 1/8” away from edge (this is very thick). IMG_2726

17. Sew top and bottom portion to area of belt desired (depending if you want it to snap in front, the side, and if it’s for left or right handed use).

IMG_2727

18. For loop portion, fold in half right sides together so that it measures 6x2 1/2 inches.  Sew 1/2” from edge. IMG_2728

19.  Turn out.  Sew raw edges together 1/4” from seam.

 IMG_2729

20.Turn and slide onto belt.

 IMG_2731 

21. Tada!   You’ve got a great accessory for your little prince, knight or solider!  IMG_3037


I just love this little guy.  He’s so expressive and isn’t he just totally made for drama?

Wednesday, March 31, 2010

Vivian’s Blessing Dress

As it turns out there is a nice learning curve to sewing.  When I made this dress I had never been very successful  making anything wearable before.  According to my friend that I gave it to it has received more complements than all of her daughters other dresses.  I thought that making Vivian’s blessing dress would be a difficult undertaking but it actually only took me about two days: one to cut and sew most of it and the second day for the finishing touches.

    IMG_2927

Here’s Vivian sitting on Grandma’s sofa on her blessing day.  I really love the ivory brocade satin that I found and the gorgeous Venetian lace that I found to trim it with.  I also got creative and made a pleated bow for her head since the bonnet  seemed a little overpowering for her little sweet face.

  IMG_2926 

Here she is with her daddy ready to go get blessed.      

IMG_2936 

It’s a little difficult to see the bow detail because of the lack of contrast but I’ll make another in color at a later date and do a tutorial if anyone is interested.

IMG_2932

Here’s a pretty fuzzy though cute picture of her big brother trying to kiss her!

Friday, February 19, 2010

Gold-Leafed Pillow

I’ve been wanting to make a pillow to match my curtains for a long time.  When I first move to the village I hated the 12' wide x 6' long windows so I put in curtains everywhere to get a little privacy.   I couldn’t find anything in my price range that even remotely looked good so I decided to dye some broadcloth.  It wasn’t as deep as I would have liked but it was adequate which is what I needed (and will need for another 6 months or so).  Anyway I planned on making a pillow in the curtain color to contrast with my bedding but never got around to it.  I wanted to bead it at first but after trying iron-on appliqué with the Halloween Costumes that I made this last year, I thought it would be really fun to appliqué leaves on a pillow for my room.  Luckily, while I was watching Martha one day, she did a reverse appliqué pillow with the perfect template!  I didn’t use her method, but I used her template and I love it!!!

 1-19-10 034

I did it with the leftover scraps of gold lame that I had ironed onto iron-on webbing and then I ironed them on and then sewed them on (as the adhesive does not adhere long to lame).  I used a matching thread to the pillow which I think gave it a lot of depth. Personally, I think it’s gorgeous!

1-19-10 075

Here it is on my chic bed in our lit’ ol’ apartment.

Sunday, February 14, 2010

Felt Roll-Up Kitchen

Around Christmas time I became intrigued with the idea of making felt food so I searched the internet like crazy for ideas (only to find shortly after that my mom was gifting fake food for Christmas).  In my searching I found this blog called Balancing Everything with a darling pattern for a felt roll-up kitchen!

Of course I had to add my own little touches which I did by embroidering the coils on the burners and adding words to the knobs and putting in a drain (what’s a sink without a drain?)

IMG_2392


Here it is in all it’s embroidered glory!

IMG_2389


It’s such a great idea and is totally portable so Christian can play with it on practically any flat surface and at the end of the day it rolls up for easy cleaning!

IMG_2394

Most importantly, Christian Loves it!  

Friday, February 12, 2010

Noah’s Ark Play Mat


One day in December when I was searching around the internet insanely finding more projects to try.  I found this darling pattern for a Noah’s Ark Play Mat at  www.freepatterns.com to make out of a blanket with some felt pieces and then some felt finger puppets to go along with it.  I of course was a little disappointed that there actually was no Noah included (or his wife either) so I made my own pattern up for both of them and then when I found some awesome striped chenille pipe cleaners I decided to make my own pattern for the tiger as well.  I also took this pattern to the next level by sewing everything rather than gluing it as it says to in the instructions.  It would have taken a lot less time if I had glued. I made two of them, one for my niece who just became a big sister and one for my son who just became a big brother. It is much more durable than it would be if glued and hopefully will provide hours and hours of fun play for both of them and maybe their siblings too.

   IMG_2249

Here’s the ark.  If you look at the pattern, I changed pretty much everything about the color scheme but I like mine better.

IMG_2251 

Here are the finger puppets.  Very colorful I must say.

IMG_2247

Here’s everything together.  I really think they turned out cute!

Wednesday, January 13, 2010

Soccer Bag Tutorial

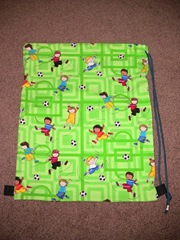
As my little boy was leaving his soccer class a week ago, he wouldn’t stop kicking the ball…even though we had already reached the parking lot…thank goodness for my blood curdling scream that stopped him in his tracks right as a huge black truck was coming along.  Yikes!  He cried and cried that I had scared him but I told him he scared me much worse.  So for a few days I pondered on what I could do to stop him from kicking the ball once practice is over and eureka! I found the solution when I went into the fabric store and found this cute print in his favorite color that just happens to match his soccer shirt.  So I decided to make him a soccer ball bag.  It fits up to full size soccer balls so he will hopefully get many years of use out of it.

IMG_2125                                 

Materials needed:

  • two 15x20  piece of Fabric
  • 4 yards nylon rope/drawstring
  • 6 inches nylon webbing
  • thread
  • sewing machine

Instructions:

  1. Cut fabric to 15x20 piecesIMG_2091
  2. Roll top edge 1/4 inch on both pieces and press.  IMG_2094
  3. Sew seam.IMG_2096
  4. On top sides of both pieces roll edges down 5 inches and iron (don’t worry about triangular edge at end of 5 inches.  This will not show in finished product).  IMG_2097IMG_2099
  5. Sew seam.IMG_2100
  6. To make casing for drawstring (on wrong side) fold over upper edge one inch (1”) and press.  IMG_2102
  7. Then sew over seam from rolled edge.IMG_2104
  8. Cut webbing into 3” pieces. Fold each piece in half.  Pin to lower sides of one of the fabric pieces (wrong side)about 5/8 inch from the lower edge.  IMG_2105
  9. Sew securely in place.IMG_2106IMG_2107
  10. With wrong sides together, pin both pieces of fabric together on sides and lower edge. IMG_2108
  11. Sew seam about 1/4 around (for extra security add a zigzag stitch around too).  IMG_2109
  12. Trim bottom corners. IMG_2110
  13. Pull inside out (use bone folder to poke out corners).IMG_2111
  14. Cut nylon rope/drawstring into Two 2 yard pieces.  On one side thread rope  up through webbing from bottom moving up IMG_2115and through one side of the casing IMG_2116over through the other side of the casing IMG_2117IMG_2118IMG_2120and back downIMG_2121 to meet other end of rope and then tie end.IMG_2122one side should look like this when completed…IMG_2112
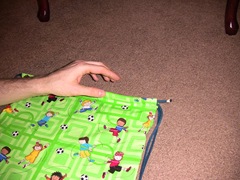
  15. Repeat on other side.  Both sides view when complete. Trim ends to match.IMG_2123
  16. Congratulations you’ve got a soccer bag!

IMG_2124